This article outlines the different entities involved in launching a PPI program with Fusion, along with their respective processes & activities. Fintech uses the Fusion APIs to launch and manage their modern banking system. Fusion on-behalf of fintech takes care of issuing cards, authorizing transactions, and communicating with payment settlement entities. Fusion partnered issuing banks offer a co-branded prepaid account proposition for fintech and neo-banking companies.
On-boarding flow
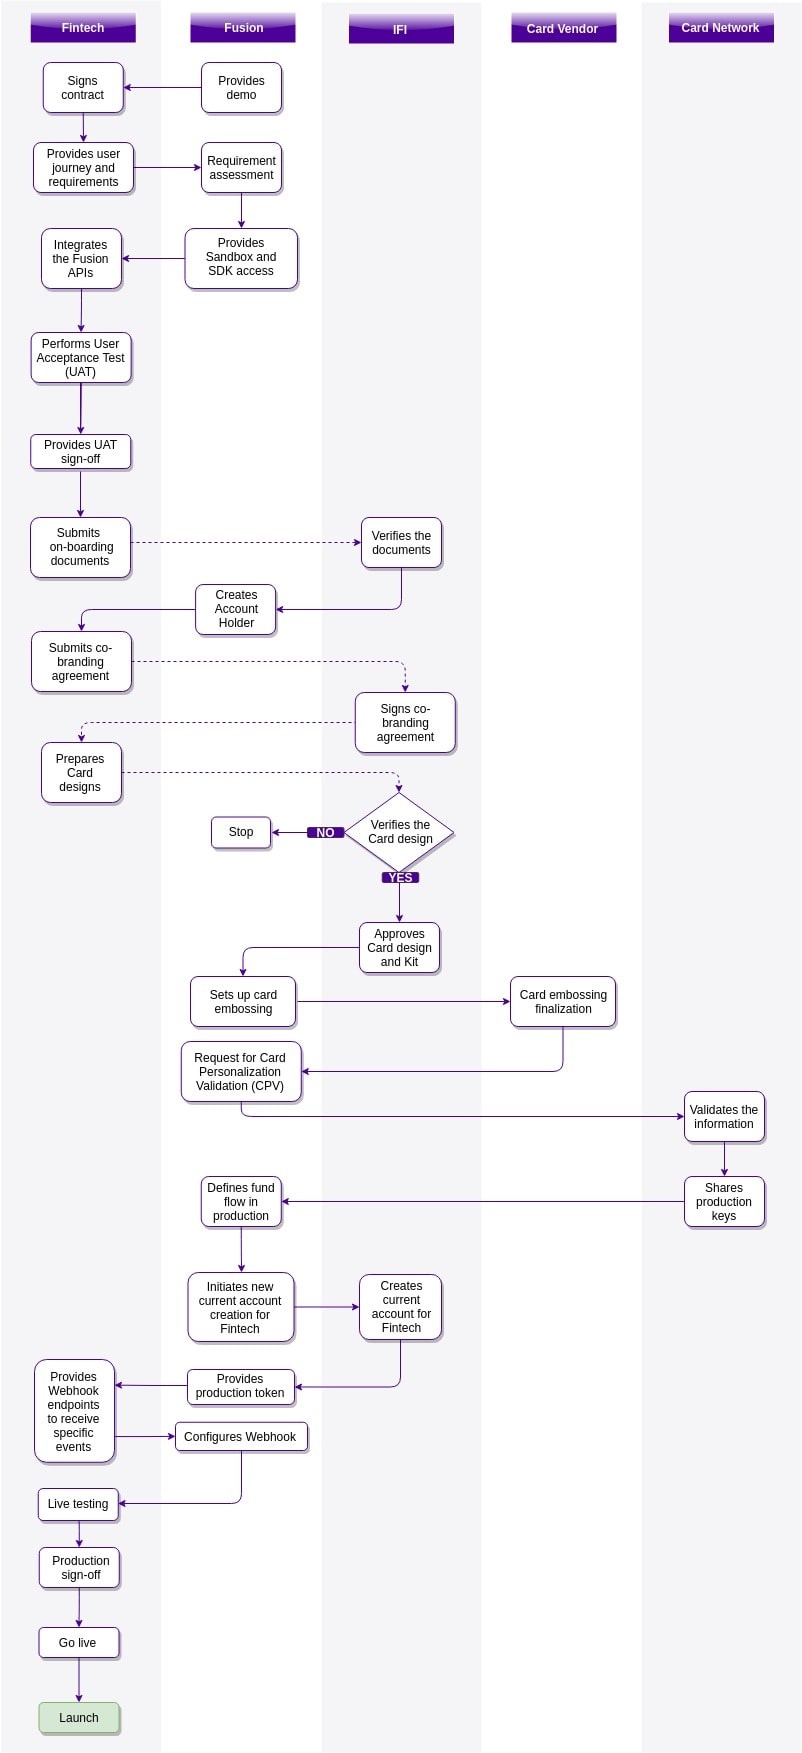
To develop your production application, you must participate in API integration, due diligence and co-branding agreement with Issuing Financial Institute (IFI). These processes run in a cross-functional manner as shown below.
Engagement journey
Your journey of integrating with Fusion begins with the sales team at Zeta. The Fusion Sales inquires about your use case to determine and to come up with the Proof of concept (POC).
Step 1: Product demonstration
The goal of Fusion's demonstration is to introduce the product and its scope to the stakeholders. The Fusion Sales Representative team will provide you a demonstration of the various capabilities of Fusion platform .
Step 2: Contract signing
The scope of work is decided based on the Business Requirements Document (BRD) which is created by Fusion team. This BRD will be attached in a Master Service Agreement (MSA) is signed by the Fintech.
Step 3: Requirement assessment
A thorough analysis of the gathered requirements is accomplished during the requirement assessment. The alternatives which can serve the purpose of the project are agreed upon with the business stakeholders.
Step 4: Sandbox and SDK access
After the requirements analysis, Zeta provisions you with access to Sandbox and SDK environments and whitelists your system’s IP addresses. For each environment, Zeta provides different access privileges and authentication tokens.
Step 5: API integration
You can integrate your system with the Fusion's RESTful APIs. These APIs use HTTP methods to perform different functions on objects. The payload in JSON format is passed along with the API call. Fusion provides a sandbox environment where you can explore the capabilities of the Fusion's RESTful APIs .
Step 6: UAT sign off
After the software becomes defect free, the UAT team considers the software application as developed. The UAT sign off indicates that the software is ready for beta testing.
Step 7: Due diligence
Zeta collects information about your company along with the legal documents, for example Corporate Identification File (CIF). The issuing bank and card network review the collected documents and approves your on-boarding.
Step 8: Co-branding agreement
The parties in this Agreement decide on marketing and branding specifications that cover provisions concerning the appearance and positioning of the respective brands. The business stakeholders target to gain more marketplace exposure by the pairing of branded products.
Step 9: Card design & Kit approval
The card vendor defines the custom scheme for card business objects including the demographic data. The parties pass approval for these card designs and the kit.
Step 10: Embossing file format finalisation
Different types of embossing file formats can be supported at the BIN range level. The Card Management System (CMS) of Zeta supports generating embossing files in different formats like XML, CSV, and Excel.
Step 11: Card CPV process
A formal Card Personalization Validation (CPV) testing ensures that the EMV cards meet stringent payment scheme specifications. The card personalization bureau analyzes and generates the EMV chip data.
Step 12: Production token sharing
Fusion APIs use Bearer Tokens which are the predominant type of access token used with OAuth 2.0. This is a single string that acts as the authentication of the API request, sent in an HTTP Authorization header . Each request to the Fusion APIs require the authentication token.
Step 13: Webhook setup
You can use Webhooks to automate business processes, for example payment request or Account to Account (A2A) fund transfer request. To setup Webhook notification, you need to setup the Webhook endpoint and then subscribe to events using Fusion APIs. Learn more about Webhooks and to know a detailed step-by-step setup process, see configuring a Webhook.
Step 14: Production sign off
Finally, a document is prepared which consists of product details and its deliverables. The designated stakeholders sign the document to acknowledge that the product meets the requirements .
Step 15: Go live:
You can perform the Beta testing in production environment to verify the readiness to release the product. A Go-live state is reached after you provide the production sign off and agree on a date for the product release.