Learn how to integrate Cipher SDK on iOS device. |
Cipher SDK is a Two Factor Authentication (2FA) solution designed to provide a secure way of verifying transactions. This is achieved by enabling customers to verify their identity. Cipher SDK ensures a safe implementation of 2FA with minimum friction without the need of OTP generation .
In this article, SDK integration is documented in both Swift and Objective C languages.
Before you begin
Take care of the following prerequisites before you begin with SDK set up:
- Fusion uses an authentication token to authenticate the SDK. Know more about the authentication token and see how to create an authentication token.
- Minimum iOS version required: 10
- Minimum Cocoapods version required: 1.9.1
- Ensure you have a cipher.plist file which contains configuration data necessary to set up the SDK. Contact Zeta in case if you haven't received the file.
Set up push notifications for your app and share the .p8 file, APNS Key and Team ID in our dashboard. This set up is required only if you are integrating the Swipe to Authenticate feature of SDK.
Getting Started with iOS Cipher SDK
Follow the steps below to integrate SDK:
- First, you should add the SDK to your project or app.
- Prepare the SDK set up.
- Now the SDK set up is ready to begin with integration process
Step 1: Adding the SDK
The iOS Cipher SDK is compatible with apps supporting iOS with version 10 and above. To add the SDK to your project, follow these steps:
Download and extract the below zip folder containing an XCFramework for Cipher SDK.
Drag & drop the XCFramework manually into your project's target.
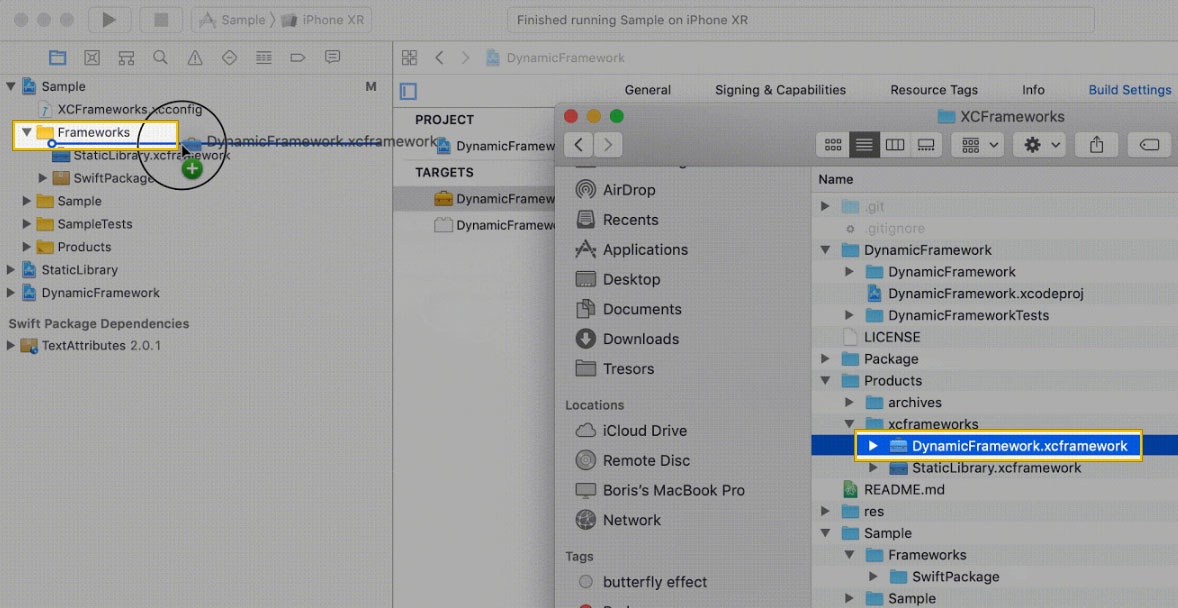
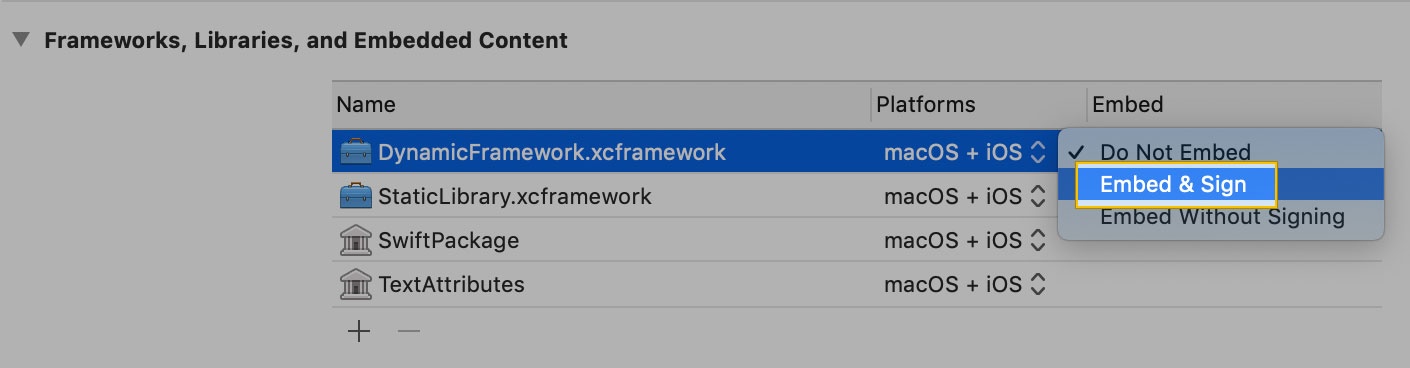
Click Embed & sign under the XCFramework in your project's target.
- Set Allow Non-modular Includes in Framework Modules to "YES" underTarget > Build Settings.
Set Enable Bitcode to "NO" underTarget > Build Settings.

Step 2: Setting up the SDK
Follow the steps below to set up the SDK:
Add the configuration file
A configuration file contains all the properties necessary for activating the SDK. You should add the file to your project (app/src/main/assets/) to prepare your app to work with the SDK. You will receive the configuration file named cipher.plist through email. If you haven't received the file, contact Zeta.
Configure properties
To enable authentication using face recognition (Face ID), add a value to the NSfaceIdUsageDescription (Privacy - Face ID Usage Description) with a message in the info.plist file.
Initialize the SDK
Create the ApolloCipher instance in your AppDelegate file. Initialize it inside the [application didFinishLaunchingWithOptions:] method of your Application class. Keep the instance for ApolloCipher globally accessible.
import CipherFramework
@UIApplicationMain
Class AppDelegate {
    var cipher: ApolloCipher?
    func application:(_ application: UIApplication,  didFinishLaunchingWithOptions launchOptions: [UIApplication.LaunchOptionKey: Any]?) -> Bool {
        let builder = ApolloCipherBuilder()
        builder.setSendPushForSandbox(true) //Set this false when you are archiving for App Store. By Default, this is set as false.
        builder.setSecureStore(securedStoreAccess) //AppSecuredStoreAccess - To be provided when using tenant secured store.
        cipher = builder.build()
    //…
    }
    //...
}
#import <CipherFramework/CipherFramework.h>
@interface AppDelegate()
@property (nonatomic, strong) ApolloCipher *cipher;
@end

@implementation AppDelegate
-(BOOL) application:(UIApplication*) application didFinishLaunchingWithOptions:(NSDictionary *) launchOptions {
   ApolloCipherBuilder *builder = [ApolloCipherBuilder new];
   [builder setSendPushForSandbox: YES]; // Set this as NO when you are archiving for App Store. By Default, this is set as NO.
   [builder setSecureStore:securedStoreAccess]; // AppSecuredStoreAccess - To be provided when using tenant secured store.
   self.cipher = [builder.build]
   //…
}
//...
@end
Step 3: Integrating the SDK
Cipher SDK is a stateful SDK. Before you start using the Cipher SDK features, take care of the following:
- Registering the SDK
- Setting up the Secured Store
- Setting up the state change listener
- Setting up Swipe to Authenticate
Registering the SDK
Cipher SDK registration triggers the authentication of the SDK using an authentication token. This token is also called a JSON Web Token (JWT) token. Please ensure to set a valid JWT token every time to register the SDK. We recommend calling the method inside the following Application function. To know how to create the authentication token, see Authenticating SDK. You require this token in Authentication API request.
func applicationDidBecomeActive(_ application: UIApplication) {
   cipher?.authenticate(tenantToken: tenantTokenView.text)
   //...
}
- (void)applicationDidBecomeActive:(UIApplication *)application {
   [self.cipher authenticateWithToken:<JWT_TOKEN>];
   //...
}
If you are using Scenes for iOS 13, do the registration in the sceneDidBecomeActive method in your applicable SceneDelegate.
Setting up the Secured Store
Cipher SDK maintains various pieces of sensitive information like Super PIN, secrets. The SDK stores this sensitive information in a Secured Store. Cipher SDK supports the following Secured Store implementations:
SDK implementation
Cipher SDK provides an implementation of the Secured Store out of the box. The SDK provided secured store supports the following:
Device lock:
The device lock is enabled by default.
SDK Super PIN:
The SDK uses 4 digit SDK PIN, if you haven't enabled the device lock to access your custom secured store. In this case, the SDK prompt you to set up the SDK PIN for securing sensitive data.Ensure you run setModalPresenterScreen before accessing the Super PIN and Swipe to Authenticate functionalities .
Hosting app’s custom implementation
If you want your custom secured Store, provide an implementation for AppSecuredStoreAccess using setSecureStore: in CipherBuilder. This interface enables the secured store to store sensitive data.
For setting up the Secured Store, you must provide an implementation for AppSecuredStoreAccess protocol. This protocol enables the Cipher SDK to securely store/retrieve sensitive data into your Secured Store. To adhere to the protocol, implement the following functionalities:
dataforKey:completion: to fetch data from the store for a particular key.setDataforKey:completion: to set data in the store for a particular key.resetAllData: to reset all the data in store.containsKey: to check if data for a key exists.
@protocol AppSecuredStoreAccess {
    func data(forKey key: String, completion: ((Error?, Data?) -> Void)? = nil)
    func setData(_ data: Data?, forKey key: String, completion: ((Error?) -> Void)? = nil)
    func resetAllData()
    func containsKey(_ key: String) -> Bool
}
@protocol AppSecuredStoreAccess
 - (void)dataForKey:(NSString *_Nonnull)key
        completion:(nullable void (^)(NSError * _Nullable error, NSData * _Nullable data))completion;
 - (void)setData:(NSData *_Nullable)data forKey:(NSString *_Nonnull)key completion:(nullable void (^)(NSError * _Nullable error))completion;
 - (void)resetAllData;
 - (BOOL)containsKey:(NSString *_Nonnull) key;
@end
Setting up the state change listener
You can instruct the SDK to perform actions based on your configurations. After the Secured Store is set up, you can decide the actions to be taken as shown in the code snippet below:
Setting up Swipe to Authenticate
The Swipe to Authenticate flow is set up along with the setting up the state change listener flow. At Zeta, we use Apple Push Notification Service (APNs) to deliver Swipe to Authenticate notifications to your app . You should set up push notifications for your app if you have not done that already. Here are the details on how to do this. After setting up the push notifications for your app, share your p8 file, team id and push notification key with our team at Zeta . We will use your APNs key to deliver notifications to your app from our server.
Syncing the push token
You should override your [application:didRegisterForRemoteNotificationsWithDeviceToken:]
inside your AppDelegate and convert the received push token to string. Now call updatePushToken: method whenever you receive a callback for the new push token . This helps the SDK to keep the push token synced in our servers and ensure a hassle-free push experience. You can use the following code snippet:
func application(_ application: UIApplication, didRegisterForRemoteNotificationsWithDeviceToken deviceToken: Data) {
        let tokenParts = deviceToken.map { data in String(format: "%02.2hhx", data) }
        let token = tokenParts.joined()
        cipher?.updatePushToken(token)
}
- (void)application:(UIApplication *)application didRegisterForRemoteNotificationsWithDeviceToken:(NSData *)deviceToken {
    const unsigned *tokenBytes = [deviceToken bytes];
    NSString *hexToken = [NSString stringWithFormat:@"%08x%08x%08x%08x%08x%08x%08x%08x",
                         ntohl(tokenBytes[0]), ntohl(tokenBytes[1]), ntohl(tokenBytes[2]),
                         ntohl(tokenBytes[3]), ntohl(tokenBytes[4]), ntohl(tokenBytes[5]),
                         ntohl(tokenBytes[6]), ntohl(tokenBytes[7])];
    [self.cipher updatePushToken:hexToken];
}
Listen to Swipe to Authenticate Push
When you receive a push notification inside the overridden didReceiveRemoteNotificationmethod of your AppDelegate, you should relay that remote notification received to Cipher SDK . You can use processSwipe2PayRemoteNotification:presentingWindow method to relay the push message object to the Cipher SDK . You can use the following code snippet:
func application(_ application: UIApplication, didReceiveRemoteNotification userInfo: [AnyHashable : Any], fetchCompletionHandler completionHandler: @escaping (UIBackgroundFetchResult) -> Void) {
	if let cipher = cipher {
    	if cipher.canProcessRemoteNotification(userInfo) {
        	cipher.processSwipe2PayRemoteNotification(userInfo, presenting: window!)
		}
	}
}
- (void)application:(UIApplication *)application
	didReceiveRemoteNotification:(NSDictionary *)userInfo
    	fetchCompletionHandler:(void (^)(UIBackgroundFetchResult))completionHandler {
    		if([self.cipher canProcessRemoteNotification:userInfo]) {
        		[self.cipher processSwipe2PayRemoteNotification:userInfo presentingWindow:self.window];
    		}
}
API Reference
Cipher SDK provides a set of public APIs which are useful to set up the SDK and access its functionalities.
- Authentication
- Secured Store
- Generate Super PIN
- Set up the modal presenter screen
- Handle notification
- Monitor token update
- Manage Listener
- Remote notification
- Logout
Authentication
This API authenticates and provides you the access to the SDK. You should pass the authentication token (tenantToken) in this API request.
authenticate(tenantToken: NSString!) -> void
- (void) authenticateWithToken:(NSString *) tenantToken
Secured Store
If a call to isSecureStoresetupRequired() returns true, you are ready to set up the Secured Store by triggering the setupSecuredStore().
- Check the state of Cipher SDK
If this method returns true, the SDK requires a Secured Store set up.
isSecureStoresetupRequired()-> bool
- (BOOL) isSecureStoresetupRequired
- Call setupSecuredStore API
This method triggers set up of secure storage. Ensure this method is called only if
isSecuredStoresetupRequired()returns true, else this leads the SDK into an unusable state. Post this step, SDK will be able to set up the Super PIN.setupSecuredStore()
- (void) setupSecuredStore
Generate Super PIN
If a call to canGenerateSuperPin() returns true, you can generate a Super PIN to secure the store by triggering generateSuperPin(completion: String, Error).
- Check the state of Cipher SDK
If this method returns true, the Super PIN set up is done. If the Super PIN functionality doesn’t work, the SDK might be in an error state. In such scenario, logout and then run the whole SDK from beginning.
canGenerateSuperPin()-> bool
- (BOOL) canGenerateSuperPin
- Create Super PIN
This method returns the Super PIN on providing authentication to the Secured Store or a device lock. Use this Super PIN to authorize the payment.
generateSuperPin(completion:SuperPinFetchBlock) -> void
- (void) generateSuperPinWithCompletion:(SuperPinFetchBlock) completion
Set up the modal presenter screen
Set the parent ViewController on top of which we want to show the PIN or device lock. This option should be used when the secured store is set up using the SDK’s implementation .
setModalPresenterScreen:(_ modalPresenter: UIViewController)
- (void) setModalPresenterScreen: (UIViewController *)modalPresenter;
Handle notification
You can listen to any change in the state of Cipher SDK integration such as, when an authentication token is required, is Secured Store set up required, can Super PIN be generated. To listen to SDK updates, you must implement the protocol ApolloCipherStateChangeListener.
canProcessRemoteNotification(_ userInfo: NSDictionary) -> bool
- (BOOL) canProcessRemoteNotification:(NSDictionary *)userInfo
Monitor token update
Please ensure that you call this method on every update of the firebase push token. See Monitor token generation for more details.
updatePushToken(_ pushToken:String)
- (void) updatePushToken:(NSString *) pushToken
Manage Listener
You can listen to any change in the state of Cipher SDK integration such as, when an authentication token is required, is Secured Store set up required, can Super PIN be generated.
- Add Listener
Use this method is used to subscribe to SDK state updates.
add(listener:ApolloCipherStateChangeListener)
- (void) addStateChangeListener:(id<ApolloCipherStateChangeListener>) listener
- Remove Listener
Use this method is used to unsubscribe from SDK state updates.
remove(listener: ApolloCipherStateChangeListener) -> void
- (void) removeStateChangeListener:(id<ApolloCipherStateChangeListener>)
Remote notification
set up a remote notification to process the Swipe to Authenticate.
processSwipe2PayRemoteNotification:(_ userInfo:NSDictionary, presentingWindow window:UIWindow)
- (void) processSwipe2PayRemoteNotification:(NSDictionary *)userInfo presentingWindow:(UIWindow *) window
Logout
When a user logs out from the app, ensure that you clear all the session data. A default call to Logout method is important for the SDK to work properly in next login session.
A simple logout is available by using:
cipher?.logout()
[self.cipher logout]
Exceptions and Error Codes
This section explains various exceptions and error codes thrown by the Cipher SDK and how to handle them. Exceptions provide system error codes along with Throwable message, that helps to recognize and troubleshoot the issue.
All the exceptions thrown will have the following fields in addition to the message:
code: Error code related to the response.traceId: Trace ID which can be provided to Zeta support for identifying the root cause.errorType: Type of error.
There are two kinds of exception that Cipher SDK can throw:
SdkAuthExceptionCipherException
The following table lists the error codes, descriptions and possible solutions. If the issue persists, contact Zeta.
| Error Code | Description |
|---|---|
| Exception thrown due to bad request. |
3001 | Internal server error. Try again. |
1001 | Internal SDK error. Try logging out and then log in. |
2000 | Authentication of JWT token can fail due to the following potential reasons:
|
2001 | Internal error caused while trying to authenticate the user. |
1001 | Error occurred when the user cancels the secure store set up. |
There will be other error codes that will be thrown from the SDK with appropriate message. For any assistance, contact Zeta.